Playing together in the pandemic: Using Jamulus for Internet
jam sessions
As
we move into winter, we're being told that it's vital we all stay
socially distanced. After a summer and mild fall when we've been able
to get together and play music outdoors, we're facing a long few months
when that option is not available. How do we avoid the temptation to
gather for a few hours in someone's house, singing and playing? Maybe
the internet can provide an answer.
At first, this sounds
impossible. Anybody who's tried to sing "Happy Birthday" to a
participant in a Zoom conference call knows the problem. You sing to
the voices you hear, but it seems they're singing at a different time,
and everything falls apart. If you've tried playing music across a Zoom
or Skype call, you know the same thing happens: it's impossible to
synchronize your parts.
The problem is latency,
the time it takes for sound to be converted from analog waves to
digital form, sent through the various pieces of hardware and network
connections, and converted back into sound at the listener's end.
Programs like Zoom, combined with standard computer audio processing
hardware, need about a half second to get sound from here to there, and
that half second is deadly for singing and playing together. In the
physical world, it takes sound about a thousandth of a second - one
millisecond - to travel one foot, so that half second is the equivalent
of trying to synchronize with someone 500 feet away - if you could even
hear them!
We do deal with latency in the physical world, of
course. We don't stand in exactly the same spot as the people we're
playing with, so we are used to dealing with a small amount of latency
in jam sessions. Even in small picking circles, people stand ten feet,
or ten milliseconds, apart. In big sessions, that distance may be
twenty feet or more. In fact, we can play pretty well with delays of up
to about thirty milliseconds. Still, that's a far cry from the 250-500
milliseconds encountered using standard conferencing software.
But people can
play on the Internet. Click the image below to hear the session
captured in the screenshot, with over 20 people singing together:

Jam software: Jamulus
This page is going
to focus on Jamulus, a free program designed to allow lots of people to
play together. The screenshot and recording above were taken from a
Jamulus session. The rest of this page takes you through a step-by-step
process for downloading, installing and setting up Jamulus, and
optimizing it for the best possible playing experience.
Jamulus is an open-source program designed
specifically to allow musicians to play together online. Unlike similar
programs like JamKazam, it depends on a server to tie musicians
together; for this reason, it allows much larger groups to connect and
play than JamKazam does.
The
page is broken down into units, each of which will take you a step
further toward the goal of playing with your friends again:
Step 1: Download and install the program
Step 2: Getting used to the program by listening to someone else's session
Step 3: Playing into Jamulus: trying a solo session
Step 4: Playing with others!
Step 5: Tuning your connection for the best possible sound with your existing equipment
Optional Step 6: Upgrade your equipment to make playing with others a better experience (or even possible).
If you know what you're doing and want the quickest possible explanation of how to get Jamulus running, here's the official Jamulus onboarding Wiki page.
Finally, a technical explanation of what's going on here, and what makes this program work when mainstream programs like Zoom can't.
Experimenting with Jamulus, Step 1: Setup
If
you're just interested in trying Jamulus out, you can do so by simply
installing and running the software. If you're using
a standard
computer configuration - WiFi, internal sound card and the like, you
won't get the best experience, but you can play and hear yourself. You
can also listen in on other people's sessions, which is generally
allowed unless the session is marked "private".
Download
the Jamulus installer from here. If you're running on a
Windows computer, you'll also need ASIO4ALL. Mac users are encouraged to install the optional program QjackCtl. Turn your speakers and
microphone on, run the installer and double-click to start Jamulus.
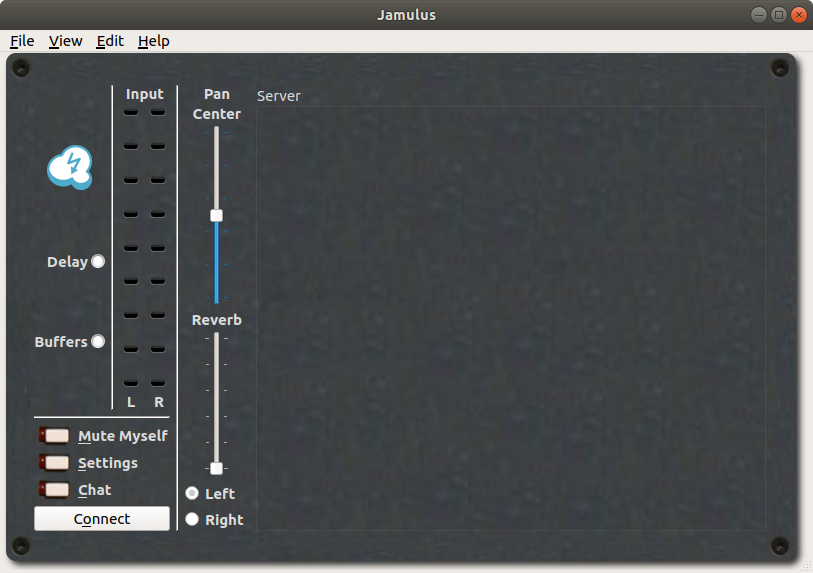
You'll see the Jamulus mixer, which looks like this:
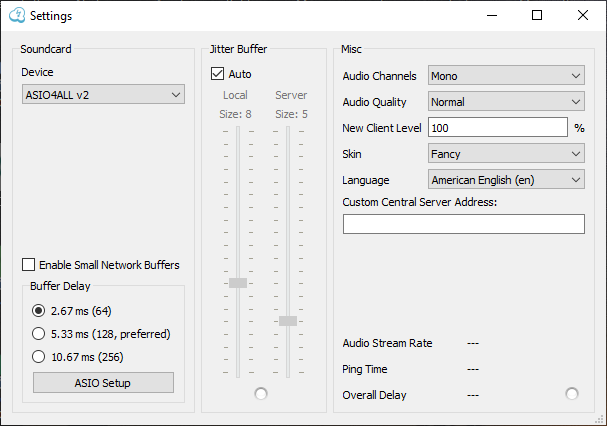
Press the Settings button and you'll see this menu pop up (Windows):
ASIO
Setup is where you'll find critical controls for minimizing latency.
Click on that button at the bottom of the menu, and you'll see an
additional menu:
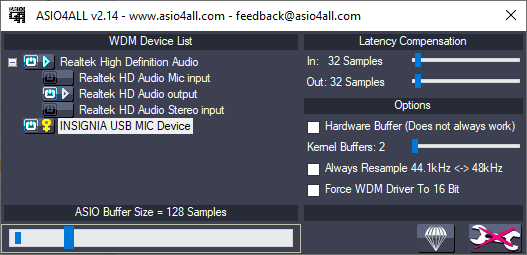
The
critical setting on this menu is the ASIO Buffer Size slider on the
bottom. This should be set as low as practically possible. This setting
is your first foray into the tradeoff between latency and quality - set
it too low, and your signal will sound like you're playing underwater;
too high, and the extra delay will make it very hard to play with other
people. If you can set it to 64 and get good results, you're minimizing
the amount of latency that the Jamulus sound processing software adds
to the overall setup.
Most people will be able to use 64 or
128 samples, a difference of almost 3 milliseconds in overall delay.
Experiment and see what you can get away with.
The second
important setting on this screen is the WDM device list. If you have
only your internal sound card to choose from, you will only see one set
of devices. If you have plugged in external USB speakers or a USB
microphone, you will see more entries in the list. In the screen above,
the Realtek HD Audio board shows one input (the built-in microphone in
the laptop) and two outputs, one mono and one stereo. This computer has
an Insignia external microphone plugged into a USB port, and that shows
up as a separate entry in the list. You can turn individual inputs and
outputs on and off by clicking on the on/off icon and the play icon
next to each. They are mutually exclusive - turning the external mic on
will turn the internal mic off.
The third sometimes useful setting is the
"Always Resample" checkbox on the right hand side. You can usually
ignore this, but if you connect to a jam session and find that your
sound is significantly out of tune with everyone else, no matter what
you do, the problem may be incompatible sampling rates. Everyone in a
Jamulus session should be set to 48kHz. If someone manages to connect
at 44.1kHz, you can try checking this box. Otherwise, you can
safely ignore it.
Now
that you've got everything configured as well as possible (for now),
it's time to connect to a server and test your setup with a solo
session.
Back to index
Step 2: Making a test connection - getting used to the
controls and listening in on a session
Before
continuing, you need to be aware of how the Jamulus universe works.
Virtually everything on the Internet operates on the basis of
individual identity. You can't use a service without providing and
verifying an email address and logging in. The services you connect to
are vetted and set up behind layers of security. This system keeps
everyone safe.
Jamulus
doesn't work that way. Anyone can set up a server, and anyone can
connect to it without providing any clue to their identity. If this
seems dangerous, realize that it can be - but it works because Jamulus
users trust the community of other musicians who use the Jamulus
service. It would be terrifically easy for a small number of jerks to
tear down this system of trust, either intentionally or through
ignorance of the rules, so it's vitally important that you understand
what is OK and what is not OK.
Above all, be polite, use common sense, and don't be that guy.
The
Internet is full of Jamulus servers. Some are chock-full of
people
making music together. Others are just waiting around. In this step,
you'll drop in on other people's sessions to see how well your system
works for incoming sound. You'll have to wait to test your microphone
and the overall performance of your system until the next step.
To start this test, run Jamulus. You'll need to set one critical
parameter before trying to connect: turn on the Mute Myself
button so the orange light next to it glows. This will allow you to
connect to a running session without being heard by the participants.
In the world of Jamulus, listening in is considered OK; making
distracting noises because your microphone is live is not. You'll know
you're muted if you see a big orange banner at the top of the jam
window that says:
MUTED
(Other people won't hear you)
For this test, don't proceed unless you see that banner.
Warning:
When you connect to a server, look for a banner near the top that says
"[Recording active]". Muting your channel will keep other people from
hearing you live, but your input will still be recorded. So if you plan
to yell at the dog or give someone your credit card number over the
phone, it's best to disconnect from the session entirely.
If the session is not being recorded, your voice will just vanish into
the ether.
It's also polite to let people know who you are. To set your identity,
open the View
menu, click My Profile...
:
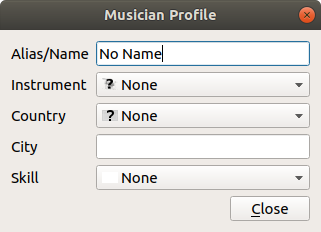
Fill in the relevant information. For now, since you're not actually
going to be participating, enter Listener
as your instrument. Your skill level is also unimportant now; when you
fill it in later, it will translate to a color code in your section of
the jam screen.
Now that you've identified yourself, tap the Connect button. You'll see
a list of available servers:
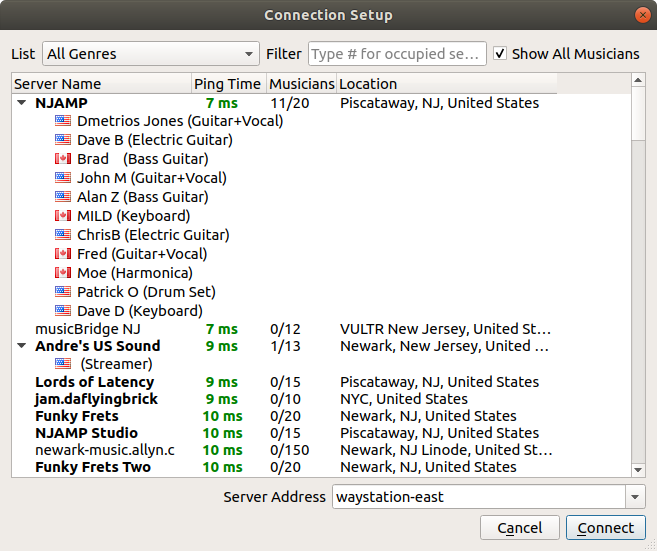
The
servers are computers that are run by individuals. There are no
qualifications to run one; you can select "Jamulus server" in
your
system's app menu and do it yourself. There are also no qualifications
to put your server on the public list, although there are some settings
outside of Jamulus that have to be set before anyone but you can see
your server. Setting up a Jamulus server is outside the scope of this
page.
On the list you will see each server's name and location. You'll also
see a measurement in milliseconds (ms) called ping time.
This is the time it takes data from your computer to reach that server,
and is a direct component of the latency you will encounter when you
connect to that server. The bigger the number, the more delay you will
hear when you play with other people on that server. When you're trying
to find people to play with, this will be a critical factor - you'll
ideally want to keep total latency below 30 ms so your playing sounds
coordinated with everyone else's, both to you and to them. However,
since you're just listening for now, this number is unimportant. You
just have to hope that the people in the session are in sync with each
other.
Some of these servers have a list of participants. These
are the ones you want to focus on. Try to find a server that has more
than one or two; some people leave themselves connected to their server
all the time, even when they're not playing, and if you connect to them
you won't hear anything. A big list shows an active jam, and that's
what you're looking for to run this test. Avoid connecting to servers
that have "Private" in the name - those people don't want strangers
listening in. Nothing will stop you from connecting, although you will
probably be asked to leave, but, again, don't be that guy,
remember?
Put
on your headphones (wired only, please) and pick a jam from the list. I
connected to the NJAMP session in the list above, and immediately heard
the session and saw this display:
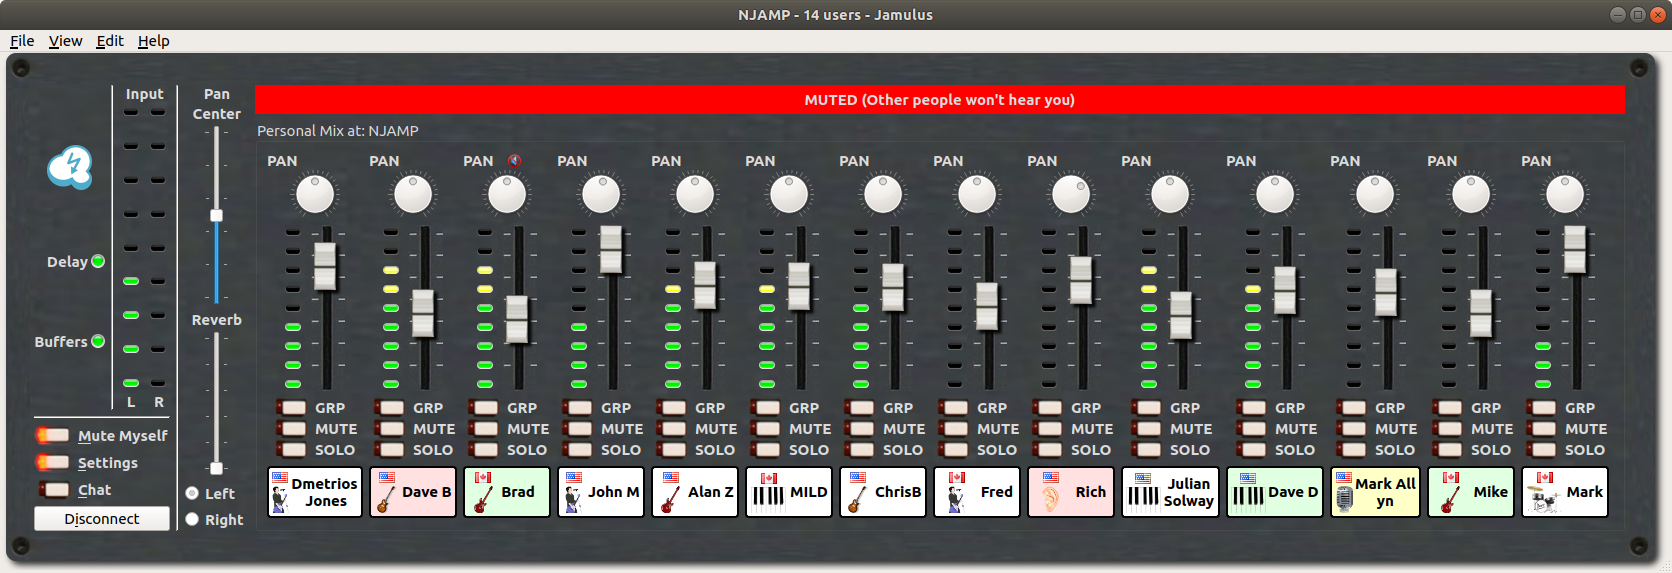
This is the control panel for the jam. It shows your personal mix
of the session. You can adjust these controls to make the musicians
sound however you want - it won't affect what anyone else hears. From
top to bottom, each channel
has a control for
pan (move the channel between your left and right ear), volume, group
(a more advanced feature; don't worry about that one for now), mute
(turn that channel completely on or off), and solo (listen to that
channel only). Play with these controls until you get used to them -
remember, nothing you do will affect what anyone hears, other than you.
The green VU meter next to the volume fader shows which channels are
active. In a big session they, along with the instrument icons in the
name boxes, can help you figure out which channel to bring up or down
to focus on a particular sound.
You may notice that you hear
noise besides the musician on some of the channels. The noise may be
clicks, pops, or an "underwater" sound. This is a sign of incorrect
channel settings - either dropouts (the network is too slow to handle
the amount of data being sent) or buffer overruns (the source computer
is processing data too slowly to keep up with the sound). In either
case, the problem is on that channel, and there's nothing you can do to
make it sound better. You'll have a chance to adjust these settings in
the next section, so your signal is nice and clean for the people who
are listening to you.
If you have gotten this far, you are proficient at the listening part
of Jamulus. You're halfway there.
Back to index
Step 3: Playing into Jamulus
Now
that you know you can hear a session, it's time to try your microphone,
and to get used to what a little latency sounds like.
To set
up for this experiment, change your profile instrument from "Listener"
to whatever you play. If you're a vocalist, there are settings for that
too. Turn off the "Mute Myself" button so you hear yourself, and make
sure your microphone is connected and turned on, if it has a switch.
For
this test, click on Connect again. You'll want to find an unused server
with fairly short latency. You're free to use anything that's out
there, although if the owner shows up you may be asked to leave - or to
become part of a session! In the server list, click on your chosen
server's name, and click on the Connect button at the bottom of the
window. You should see one channel in your personal mix:
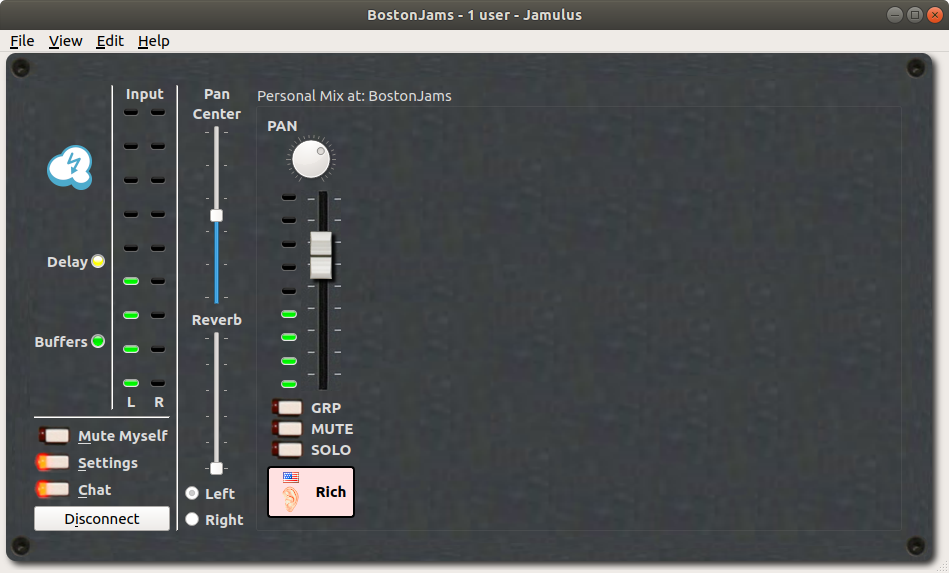
Tap
on your microphone. You should see the green lights on your channel
bounce up and down, and you should hear the tapping sound in your
headphones. If you do, you've successfully made a connection. You need
to learn how to adjust your channel for the best sound quality and
shortest latency, but you have successfully played music into the
Internet.
If you don't hear anything, and all the lights are
dark on your channel, you may need to check your input settings (see
"ASIO setup" above), to make sure Jamulus is listening to the same mic
you're talking through. If the mic is powered, make sure the power
source is on or the batteries in the mic are good. You should also make
sure your mic is turned on and connected to the correct port on your
computer. If all else fails, try using your mic and headphones with
some other recording program, like Audacity or your system's sound
recorder. Both Windows and MacOS have sound control panels that provide
visual confirmation that your microphone is receiving sound, and that
generate test sounds that you can hear through your headphones. You can
use these to make sure that everything other than Jamulus is working
correctly.
If the green lights on your channel are bouncing, but
you still don't hear anything, the mic is probably working correctly.
Check your sound output - is the volume turned up? Are the headphones
plugged in correctly? Is ASIO set to use the correct output channel?
Back to index
Step 4: Playing together
Now
that you've got all your equipment tested, it's time to try the real
thing! Contact a friend or two or more. Actually, you might want to
start with fewer just because there's less to go wrong. It isn't really
more complex to run a session with lots of people, but if one person
has a problem - feedback, for example - it can spill over into
everybody's experience. If you're doing a short test, find a nearby
unused server (nearby defined by short ping time), hop on, and try
playing together. Every guide to using Jamulus recommends turning off
the local monitor, the thing that lets you hear your own signal before
it makes its round trip to the server. If you're singing or playing an
acoustic instrument, you hear yourself through the air, so this is not
quite as useful, but still worth doing so that you minimize the
confusion of hearing your own sound twice because of the echo. You can
do this by pressing the Mute button on your channel or by sliding your
fader all the way down to zero.
Once you've connected, you
should be ready to go. You've already practiced using all the Jamulus
controls in the previous sections. Adjust your mix using the faders.
Separate your sound from others with the Pan dial at the top of each
channel. Add a little sheen of reverb to the whole system. Most
important, use the buffer size and jitter settings on the Settings
panel to achieve a usable balance of delay and quality. Too much delay,
and you'll find your playing slows down as you try to stay in sync
because the music of other people arrives too far behind your own. Too
little quality, and the sound will be unlistenable. Step 5 will take you through some of the adjustments you can make.
If
you can't manage to get your connection tuned and playable, all is not
lost. It's very possible that you can upgrade your equipment to improve
both quality and delay. Check out Step 6 for a list of things you can try. Some of them are even free, or very close!
If
your connection works, on the other hand, you're all set! Look around
for sessions you're compatible with, and use the festival jam session
protocol - enter as a listener, with your mic muted, and decide if you
fit in. If you think you will, unmute yourself, say hello, and ask
permission to join.
If you really want to control your jam
opportunities, it's fairly easy to set up a server even on your own
computer, and invite your friends in. That's outside the scope of this
page, but if there's enough interest I'll put that up too.
Back to index
Step 5: Tuning your connection
Running
these tests should get you to a working system. You should be able to
speak or play into your microphone and hear yourself through the
headphones.
In an
ideal world, there should be so little time between producing a sound
and hearing it that the two are simultaneous. In the real world,
however, there's lots happening, and all of it takes time.
(TL;DR: the next
paragraph contains stuff you don't actually need to know, but that will
make it easier to understand the things you will need to know. You can
skip it if you want.)
You
play into the microphone. The sound is translated into a digital
signal. The signal is broken up into small sections, or packets, that
can be sent over the Internet. The packets are sent to your home router
as data. The router sends each packet to the Jamulus server, possibly
by a different route for each packet. The Jamulus server's router
receives the packets, reassembles them into data, and sends them to the
server. The server collects your data, combines it with the data from
all the other session participants, and sends it back out to you. Now
the data has to make the same trip in reverse, be processed by your
Jamulus app, and translated back from digital form to sound so you can
hear it in your headphones.
(End of geek stuff. You
need to read what comes next.)
The
magic of Jamulus is that it can accomplish everything you need to hear
your music and your session mates' music in a short enough time - under
20 milliseconds, not counting the network ping delay - to allow you to
play as if you're in the same room. In contrast, conferencing programs
like Zoom take between 200 and 500 milliseconds to move sound over the
same network path. You may have to make a few adjustments to make
things work, though.
Picking your session
The
first thing you need to know is how to choose a session that has a
chance of working for you. This is what the ping time is for - it
measures the one part of the system you can't improve, the time
required for a signal to travel from you to the server and back again.
You can choose equipment that speeds up your sound processing, but the
ping time is determined by the network distance between you and the
server, and the most immutable law in the universe: the speed of light.
Quality vs. latency
You'll want to go into the Jamulus settings panel to see
what you can tweak. Here's what the panel looks like when you're
connected to a session in Windows (the Mac panel will be similar):
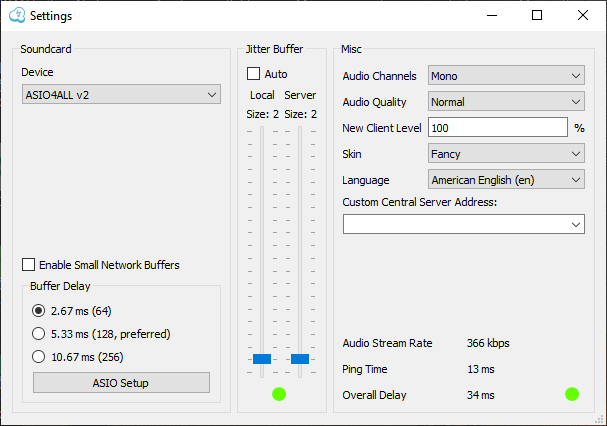
There
are a few things to be aware of on this screen. First is the buffer
delay in the lower left corner. This parameter, which you can set, has
a direct impact on your delay time. It also has a direct impact on your
sound quality - a classic tradeoff of quality for speed. Set it too
high, and you'll hear the echo delay increase; too low, and you'll get
that "underwater" sound that indicates buffer overruns. How much
distorted sound you're willing to tolerate in the name of delay - which
can make or break your ability to play in the session at all - is up to
you and your jam-mates, since they will hear the same distortion you
do. You can experiment in your solo session, and hear the effect of all
these changes.
In the center of the screen is the jitter
buffer control. Like the buffer delay, the jitter buffer adjusts the
amount of time the network is allowed to process the sound you're
making and hearing. Also like the buffer delay, it allows you to trade
speed for quality - lower values of these sliders means a faster
network, but more potential for overruns and the "underwater" effect.
If your network is fairly fast, it's best to keep this setting on Auto
using the checkbox at the top. That will allow Jamulus to adjust the
buffers to respond to temporary changes in network traffic. If the echo
delay caused by latency is close to your limit, turn Auto off and
adjust the sliders by hand. You'll hear the effects immediately.
You
will also notice the green dots at the bottom of the window. These dots
measure latency objectively, and will turn red if Jamulus thinks your
signal delay is too long. In general, alternating red and green is
tolerable, but solid red will probably be unlistenable for you and
everyone else. Adjusting the settings discussed above will have a
direct impact on these lights; use them as a rough guide, but trust
your ears above all.
There is one other adjustment you can make
on this screen, "Enable Small Network Buffers". As a rule, leave this
off. We've never seen it improve the performance of a connection.
The
numbers in the lower right section of the window show you the results
of all this adjustment. Ping Time is a live measurement of the time a
signal needs to travel the length of the connection. It is unaffected
by any changes you make, and will stay more or less constant as long as
you stay connected to the same Jamulus server. Use it as a guide to
whether a server is worth trying to connect to - ping time over 20ms,
added to all the signal processing your computer performs, will
probably be too long to be usable no matter how you tune your settings.
Note: this number will probably vary
by 5ms or so as you watch it. If you see giant changes - for example,
15ms to 50 or 60ms for a short time - make sure you're using a wired
internet connection. That kind of variance is a sign of a WiFi
connection.
The other two numbers on this screen are for
information only. Overall Delay is calculated based on assumptions
about your equipment. It is an approximation, not an actual
measurement, and it changes in lockstep with the Ping Time. If you use
your computer's internal sound hardware, your actual delay will
probably exceed this number; if you use a really fast external
interface like the Focusrite, it can be significantly shorter.
For more information and the official guide to Jamulus controls, check this document at jamulus.io.
If everything is configured well, you should now be able to click the Mute button on your channel (not
the "Mute myself" button at the left side), speak or play into your
microphone and hear your sound, processed by the server and returned to
you, in your headphones. You can experiment with the fader to change
the volume of your channel, and the Pan dial to move yourself from one
ear to the other. You will be able to do that with every channel in a
live session - remember, those adjustments only affect what you hear.
You can also add reverb to the overall signal, and if your microphone
is stereo (or you have two microphones) you can adjust the reverb and
balance of your signal using the Reverb and Pan controls on the left
side of the screen - those adjustments will be heard by everybody.
You
have now successfully configured the input and output functions of
Jamulus, and your live session is as good as your equipment can make it.
Back to index
Step 6: Improving your equipment
You
knew this was coming, right? Now that you can play online, there has to
be something you can do to make the experience better. I've tested all
the equipment in this list. I'll be happy to post whever works for
anyone else.
Remove all wireless connections.
No bluetooth microphones or speakers and no WiFi internet. If you're
close enough to plug an RJ45 cable into your internet router, do it.
You can buy one from Amazon here,
in whatever size you need. If you have to buy a 100 foot cable and run
it upstairs to plug into your router, it will be worth it.
Move audio processing out of your computer.
This means plugging external sound devices into your computer instead
of relying on the internal sound card, which is almost never designed
for fast audio. It is especially important on the input side - the
built-in microphone in most laptops is one of the biggest fixable
sources of latency in your computer. On the output side, make sure
you're using wired speakers - Bluetooth will provide guaranteed delay.
Needless to say, your external microphone must be connected to the
computer by wire, as well.
It is possible to fix the input side with a low-end USB microphone like this one
for under $25. This microphone should shave at least ten milliseconds
off your round-trip time, especially if you're running a laptop. Tested
and working with Windows 10. Does not work with Ubuntu Linux. Not
tested with MacOS.
The pro approach to fixing both input and output is a digital audio workstation (DAW) like the Focusrite Scarlett 2i2.
That will give you the most flexibility on inputs and outputs. It will
give you the absolute minimum latency, both because the sound
processing hardware inside is optimized for speed, and because you will
be able to use the smallest possible buffer delay value in the Jamulus
settings. This will be 64 frames or 2.67 ms on a Windows or Mac
computer. The Scarlett also allows you to plug in two microphones and
gives you good old-fashioned dials for controlling your input and
output sound. Output can be through standard headphones, or sound
system speakers, or both at once. To use this box you'll need to buy a
pro microphone like the Shure SM-57, and a cable
to connect it with. If you already own sound system equipment for a
band or other PA, you probably have a mic and cable that work. The
Scarlett will set you back about $160, the mic about $90, and the cable
another $10.
Finally, if you have a low-end network connection
and see bigger ping time numbers than your jam-mates, you can talk to
your Internet service provider about upgrading your network speed, or
change providers entirely. Some providers are intrinsically slow (Dish,
Charter and RCN are frequent offenders) while others like FiOS are
built for speed. This is not an endorsement of any particular ISP, so
shop around.
Back to index
Tech geekery: Where latency comes from, and how to fix it
In
a real-time connection, latency is introduced in several places. Here
they are, in rough order of their impact and possibility of fixing:
- Conferencing software. This is the big
kahuna. Standard
videoconferencing software like Zoom and Skype work fine for normal
conversations, where people talk in turn. Because they are not designed
for everyone to talk at once, they sacrificelatency to get better
quality. Cell phones do the same thing - if you call or Zoom someone
within earshot of your phone, you will hear a significant delay between
your speech and the sound from the other end of the connection. If you
try to count along with someone on the other end of a call, you'll find
it's impossible for both of you to line up your numbers.
In conversation this is a minor annoyance - we're used to knowing how
long to wait after the other person has stopped talking before we
start, and that extra fraction of a second can throw us off. In music,
it's deadly, as described above. To make that delay short enough so
playing music is enjoyable, you need software that is designed to make
latency as short as possible without turning the sound into a mass of
dropouts, buffer overruns and other noise.
Fortunately, there are several programs like Jamulus
and JamKazam
that can accomplish that, and many of them are free to use.
- Home
network. Your
local router and network interface introduce
a certain amount of latency. This can be minimized by using a wired
Ethernet connection plugged directly into your router, instead of WiFi.
WiFi is not only slow, it's inconsistent - the amount of delay it adds
can double or triple from moment to moment, making the signal even more
unreliable. A wired connection is fast and steady.
- Audio
connection. Like
the network, wired is better than
wireless for both headphone and microphone connections. No Bluetooth -
use wires.
- Signal
processing gear.
If you're used to talking into the
built-in mic on your laptop, you
should realize that the sound card in there is not designed for speed.
There are external sound interfaces for about $150, or even cheap USB
microphones for about $25, that will speed up your connection.
- The
Internet.
There's
not much you can do to improve the way your audio signal travels across
the Internet. Some people might be able to upgrade their network speed
or change providers, but the majority of the delay here comes from the
simple fact that it takes time for data to move around the country. It
helps to have everyone involved close together - you're not going to
have a good experience jamming with folks across the country or across
the ocean - but a bunch of people clustered around Boston, New York or
even Washington, D.C.can have a surprisingly good time.